


Rhythm training for piano: a 4-week practice plan
- Dan Piano Studio
- 6 days ago
- 13 min read

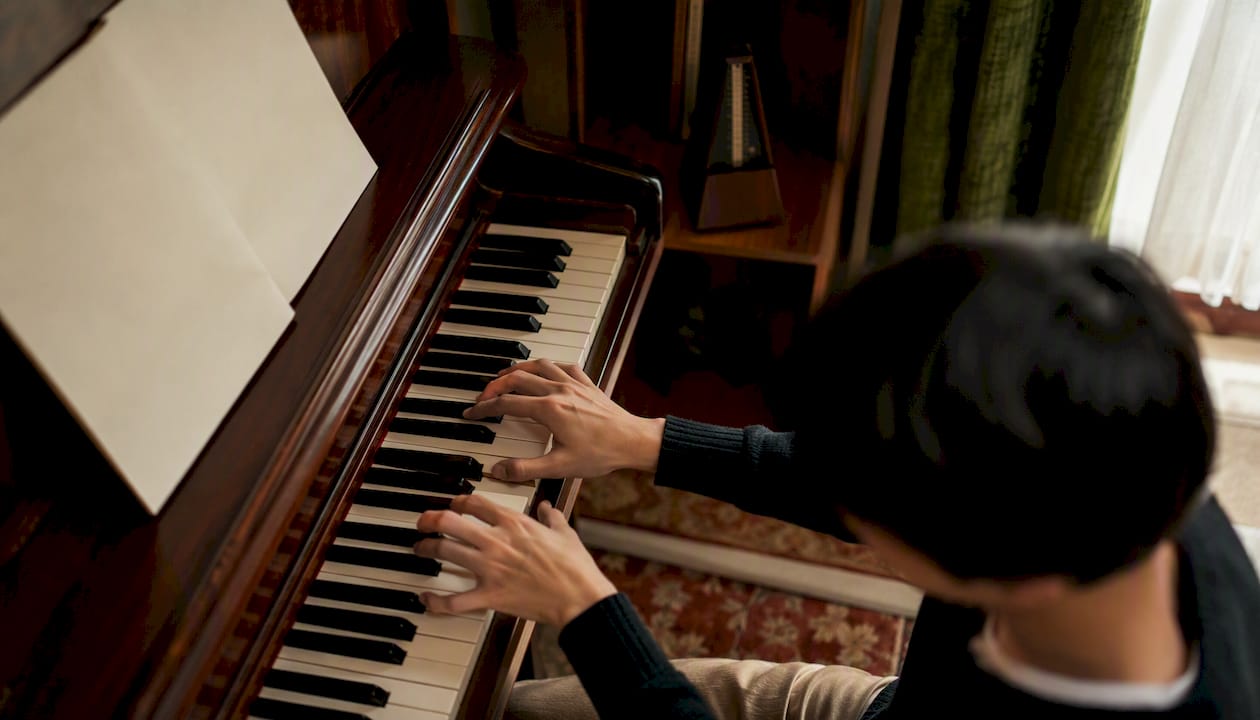
Ten to twenty minutes of focused daily rhythm work, using a metronome and deliberate subdivision drills, will produce measurable timing improvements within four weeks. That is not a vague promise. It is what happens when you stop practising rhythm passively and start treating it as a skill with its own dedicated exercises. Here is a session you can run today.
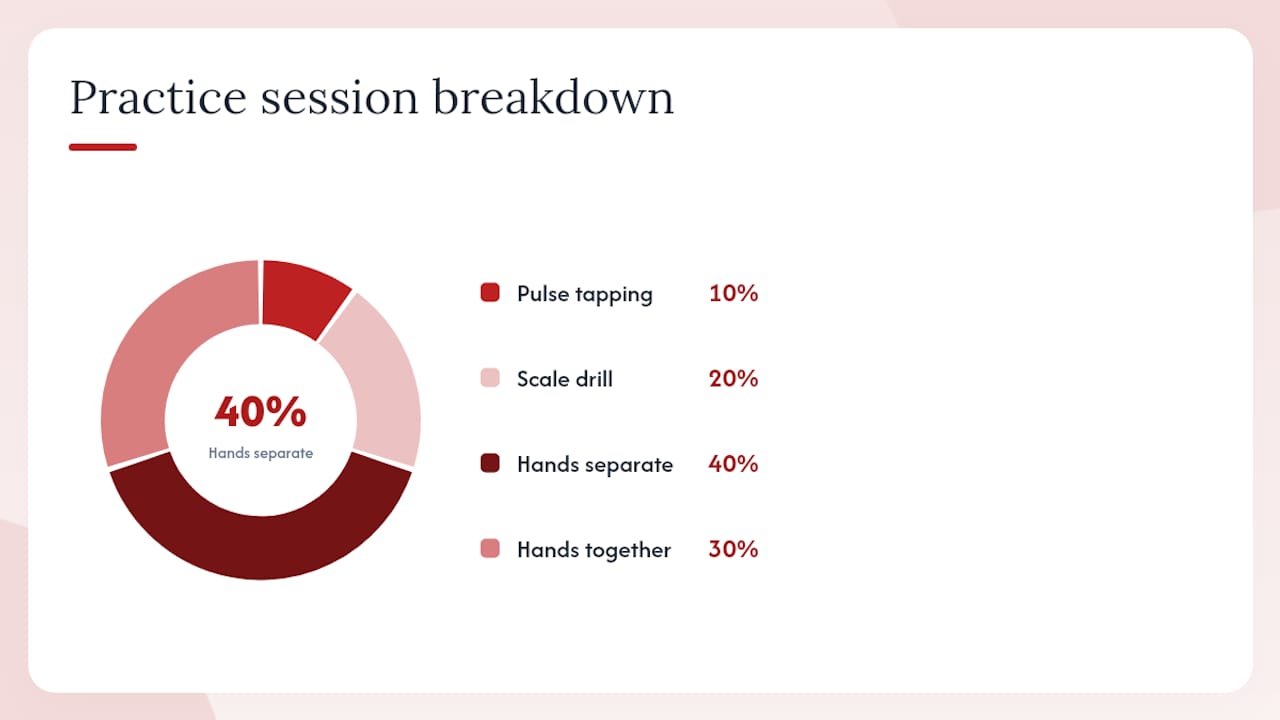
A single daily session (10–20 minutes):
Minutes 1–2: Tap a steady pulse on your knee or a table. No piano yet. Feel the beat in your body before you touch a key.
Minutes 3–6: Set your metronome to a comfortable crotchet tempo starting at a slow to moderate speed. Play a single scale, counting aloud: “1-&-2-&-3-&-4-&.” Hear every quaver land on a click or exactly between clicks.
Minutes 7–14: Choose one short passage (four to eight bars) from your current piece. Drill it hands-separately at a tempo where every note is clean, then raise the metronome by 5 BPM when two consecutive runs feel even.
Minutes 15–20: Play the same passage hands together at a musical tempo, metronome off. Notice where the pulse wavers and any inconsistencies.
Track three things each session: steadiness of pulse in the scale drill, which subdivision trips you up, and the general area where hands-together playing breaks down. Write them down. That record can guide your practice over the following weeks.
Key takeaways
Consistent rhythm improvement on piano requires daily focused drills, a diagnostic approach to the metronome, and isolating the smallest failing unit rather than repeating whole passages.
Point | Details |
Daily routine | Run a 15–20 minute session: pulse warm-up, subdivision drill, spot work, then musical application without the click. |
Diagnostic metronome | Raise the tempo one notch to find the breakdown, slow to fix the two- or three-note unit, then rebuild in 5–10 BPM steps. |
4-week progression | Move from quaver evenness (Week 1) through semiquavers and dotted rhythms (Week 2) to syncopation and musical integration (Weeks 3–4). |
Counting aloud | Speak subdivisions (“1-&-2-&” or “1-trip-let”) while tapping the pulse; this engages the body and forces precise note placement. |
Danpianostudio | In-person lessons in Central London and online sessions provide real-time breakdown diagnosis and a targeted weekly drill to accelerate progress. |
Table of Contents
What are the best rhythm training exercises for piano?
The most reliable piano rhythm exercises target one thing at a time: pulse, subdivision, or articulation. Mixing all three at once is how most learners stall.
Scale-based subdivision drills
A simple C major scale becomes a powerful rhythmic tool when you use it to practise note values rather than finger patterns. Play the scale in crotchets first, then quavers, then semiquavers, keeping the metronome click constant throughout. The moment a note rushes or drags, you have found a weak finger or a coordination gap. Triplet scales work the same way: “1-trip-let, 2-trip-let” spoken aloud while playing forces the brain to subdivide evenly rather than approximate.
For beginner piano exercises, start with quavers only. Intermediate players can move directly to semiquavers once quaver evenness is solid.
Single-note metronome drills
Set the metronome to click on every beat (pulse click) and play a single repeated note in quavers. Then switch: set the click to land on every quaver (subdivision click) and play crotchets. The contrast is revealing. Most players are steadier when the click fills in the gaps for them. The goal is to be equally steady either way.
A third option, clicking on every semiquaver, is the most demanding. According to Pianist Magazine, setting the metronome to a semiquaver pulse on dense passages forces physical evenness before you graduate to a larger pulse for musical phrasing.
Articulation drills
Play a four-bar phrase entirely staccato. Then entirely legato. Then alternate: staccato right hand, legato left. Rhythmic inaccuracy hides inside articulation changes because the physical preparation for each note type is different. Staccato tends to rush; legato tends to drag. Isolating articulation makes those tendencies audible.
Pro Tip: When a learner struggles with a drill, back off one subdivision level rather than slowing the tempo alone. A student who cannot play even semiquavers should return to quavers at the same tempo, not semiquavers at half speed. The subdivision is the unit to simplify, not just the speed.
How do you practise dotted rhythms, syncopation and tuplets?
These three patterns trip up learners at every grade level, including ABRSM Grade 5 and above, because each one places emphasis somewhere the pulse does not naturally land.
Dotted rhythms
The most common error is shortening the dot. A dotted crotchet followed by a quaver should feel like “LONG-short,” with the short note arriving precisely on the subdivision. Here is the drill progression:
Clap the rhythm slowly, counting every semiquaver aloud: “1-e-&-a, 2-e-&-a.”
Play the right hand alone at 60 BPM, metronome on semiquavers.
Add the left hand at the same tempo, still counting aloud.
Once both hands are clean, raise the tempo by 5 BPM and repeat.
Never skip step one. Clapping first, before touching the keys, engages the body’s sense of pulse independently of finger habit.
Syncopation drills
Syncopation places the accent on a weak beat or between beats. The practical fix is to anchor the strong beats first:
Play the passage with the off-beat notes removed, so only the on-beat notes sound. Feel the pulse settle.
Add the off-beat notes back one at a time, keeping the on-beat anchor steady.
Once both hands play together, tap your foot on beats 1 and 3 to maintain the underlying pulse.
For jazz-style syncopation and swing feel, the jazz piano guide at Danpianostudio covers the specific rhythmic vocabulary in more depth.
Basic tuplets (2:3 and 3:4)
A triplet against a duple pulse (3:4) is the coordination challenge most students dread. The simplest drill: play the left hand in steady crotchets while the right hand plays triplet quavers, saying “1-trip-let” for each group. Once that feels stable, swap hands. The Feezell Rhythmic Patterns collection provides graded versions of these patterns, including 3s, 4s, 5s and 7s, so you can step back to a simpler variant rather than pushing through errors.
For immediate feedback on tuplet placement, an online rhythm trainer that measures timing to millisecond precision is worth ten minutes of clapping practice.
How to use a metronome correctly for piano practice
The metronome is a diagnostic instrument first, a tempo enforcer second. Most players use it the wrong way round.
Pulse click vs subdivision click
Metronome setting | Best use | What it reveals |
Click on every crotchet | Musical passages, checking overall steadiness | Gross tempo drift, rushing at phrase ends |
Click on every quaver | Intermediate drills, dotted rhythms | Uneven quaver spacing, dotted-rhythm errors |
Click on every semiquaver | Dense passages, scale drills | Physical unevenness between fingers |
Start with the pulse click to get a feel for the passage. Move to the subdivision click when you suspect unevenness but cannot locate it.
The diagnostic method
Piano Fantasy’s metronome guide describes the most effective approach: raise the click by one notch above your comfortable tempo. The passage will start to crack at a specific bar or beat. That is the breakdown point. Slow to a tempo where you can play that two- or three-note unit cleanly, fix it, then rebuild tempo in 5 BPM steps.
Tempo progression rules
According to PianoStartGuide, always start at a tempo where the passage is genuinely easy, then raise in increments of 5–10 BPM. Practising at an unmanageable speed does not build speed; it trains errors. Record yourself at each tempo step. The recording will show drift you cannot hear in the moment.
What to avoid: Never raise the tempo until two consecutive clean runs are done at the current speed. Never use the metronome for rubato passages or expressive phrasing work; musical shaping needs sections without the click.
Counting systems that actually work at the piano
Counting aloud engages multiple parts of the brain simultaneously, which is why it works better than counting silently. The physical act of speaking the subdivision forces commitment to a specific placement.
Which system to use and when
Three counting approaches cover most situations:
“1-&-2-&” for quaver subdivisions in 4/4 or 3/4. Simple, universal, works at any tempo.
“1-trip-let, 2-trip-let” for triplets. The three syllables are naturally equal in length, which trains even spacing.
“1-e-&-a” for semiquaver subdivisions. More demanding to speak at speed, but precise for dense passages.
Tapping drills that reinforce counting
Combine counting with a physical tap to lock the subdivision into the body:
Tap your foot on every crotchet beat while counting “1-e-&-a” aloud.
Clap the rhythm of the right-hand part while the foot continues.
Transfer the right-hand rhythm to the piano, foot still tapping, counting still spoken.
Add the left hand, keeping the foot tap and spoken count going for at least four bars.
Switching between counting schemes
Some passages shift between duple and triple subdivisions. To practise the switch: play four bars in “1-&-2-&,” then four bars in “1-trip-let,” then combine them in the order the piece requires. Do this at a slow tempo (50–60 BPM) until the switch feels automatic. For a solid grounding in note values and how they relate to counting, the piano theory basics guide at Danpianostudio is a useful reference.
How do you build hand independence through rhythm drills?
Coordination problems are almost always rhythm problems in disguise. One hand rushes; the other waits. The fix is not to practise hands together more. It is to isolate the problem hand until its rhythm is independent.
The hands-separate sequence
Work through this order every time a passage breaks down:
Right hand alone, metronome on subdivisions, until the rhythm is automatic.
Left hand alone, same tempo, same metronome setting.
Both hands together at 10–15 BPM below the hands-separate tempo.
Identify the smallest unit that still breaks (often two or three notes at a transition). Drill that unit alone, both hands, until it is clean.
Rhythmic displacement drills
Play the right-hand melody starting on the “&” of beat 1 instead of beat 1 itself. This forces the hand to function independently of the downbeat anchor it usually relies on. It feels strange at first, which is the point. Once the hand can place notes on any subdivision, coordination with the left hand becomes much easier.
Integrating articulation and dynamics
Once the rhythm is stable hands together, add one layer at a time: first articulation (staccato/legato as written), then dynamics. Adding both simultaneously usually collapses the rhythm again. Patience here saves time overall. For technique-focused exercises that pair well with these drills, the piano technique exercises page at Danpianostudio covers finger control and coordination in detail.
Pro Tip: Mark the score. Circle the exact bar where the breakdown happens. Put a pencil bracket around the two or three notes that fail. Practising the whole passage again from the top is the slowest possible fix. Practising the bracketed unit for two minutes is usually enough.
A daily session template and 4-week progression
Structure matters as much as the exercises themselves. A session without a plan tends to drift toward the parts of the piece you already play well.
Daily session template (15–20 minutes)
Phase | Duration | Activity |
Pulse warm-up | 2 min | Tap pulse, then play one scale in crotchets and quavers, metronome at 60 BPM |
Subdivision drill | 4 min | Scale or single-note drill in semiquavers or triplets, metronome on subdivisions |
Spot work | 8 min | Identify the one bar that broke down last session; drill the failing unit hands-separate, then together |
Musical application | 4 min | Play the full passage at musical tempo, metronome off; note any new breakdown |
4-week progression
Week | Focus | Goal | Checkpoint |
1 | Pulse and quaver evenness | Play a scale in quavers at 72 BPM with no drift | Record one run; listen back for rushes |
2 | Semiquaver control and dotted rhythms | Clean semiquaver scale at 60 BPM; dotted-rhythm passage hands-separate | Mark score; note breakdown bars |
3 | Syncopation and tuplets | Hands-together syncopated passage at 80 BPM | Compare recording to Week 1 |
4 | Musical integration | Full piece section at performance tempo, metronome off | Record and assess steadiness without click |
Measure progress by how quickly a breakdown disappears. In Week 1 it might take ten minutes to fix a two-note unit. By Week 4, the same size problem should resolve in two or three minutes. That acceleration is the real sign of improvement. For a broader structured learning path, the beginner piano learning guide at Danpianostudio sets realistic tempo goals week by week.
Common rhythm mistakes and how to fix them quickly
Most timing problems come from three sources: physical tension, micro-preparation failures, and habitual rushing at transitions.
The most common errors:
Rushing at phrase ends. The last two notes of a phrase almost always arrive early. Fix: place a metronome click on the last note of the phrase and hold it for its full value before moving on.
Uneven semiquavers. Usually fingers 4 and 5 are slower, causing a micro-lurch. Fix: drill the weak finger pair (notes 3–4 or 4–5 in the scale) in isolation at a slow tempo.
Losing the beat on a rest. Rests are not silence; they are counted time. Fix: tap the rest value on your knee while the other hand plays.
Tension causing rigidity. A tense wrist locks the hand into a fixed position, making even semiquavers physically impossible. Fix: stop, shake out the hand, and restart at a slower tempo with a relaxed wrist.
Troubleshooting steps:
Raise the metronome one notch above your comfortable tempo to locate the exact failing note.
Slow to 50% of that tempo and play only the two notes around the failure point.
Add body percussion (tap the pulse on your knee) to re-establish the physical beat.
Rebuild tempo in 5 BPM steps.
What to avoid: practising through mistakes at speed, raising the tempo before two clean runs are done, and using the metronome click as a crutch for musical phrasing. The effective piano practice guide at Danpianostudio covers the broader practice habits that support this kind of focused troubleshooting.
Which apps and books help with rhythm training?
A small number of tools genuinely accelerate rhythm learning. Here is what is worth your time.
Apps and online trainers
The Piano Rhythm Trainer by The Maestro Online is free and measures timing accuracy to millisecond precision. It progresses through subdivisions, syncopations and tuplets, making it useful for both beginners and intermediate players who want objective feedback outside of lessons. It works in any browser, so there is no download required.
For a metronome app, the built-in options on most smartphones are adequate for basic pulse work. If you want subdivision clicks and programmable accent patterns, a dedicated app with those features is worth the small cost.
Books and pattern collections
The Feezell Rhythmic Patterns PDF by Mark Feezell, Ph.D. is a free download and one of the most thorough rhythm catalogues available. It covers patterns in 3s, 4s, 5s and 7s, with graded versions of each so you can step back to a simpler variant when a pattern is too difficult. It is not piano-specific, but the patterns transfer directly to keyboard practice.
For UK learners preparing for ABRSM or Trinity exams, the relevant grade syllabus documents include rhythm-reading components. Practising the specific note values and time signatures listed for your grade is more targeted than a general rhythm book.
Pro Tip: Use the Feezell PDF alongside your current piece. Find the rhythmic pattern in the piece that is causing trouble, locate the same pattern in the PDF, and drill the simpler version first. That scaffolded approach is faster than drilling the piece itself repeatedly.
How we teach rhythm at Dan Piano Studio
At Dan Piano Studio, rhythm is treated as a technical skill with its own warm-up, drills and measurable goals, not as something that improves automatically through repetition.
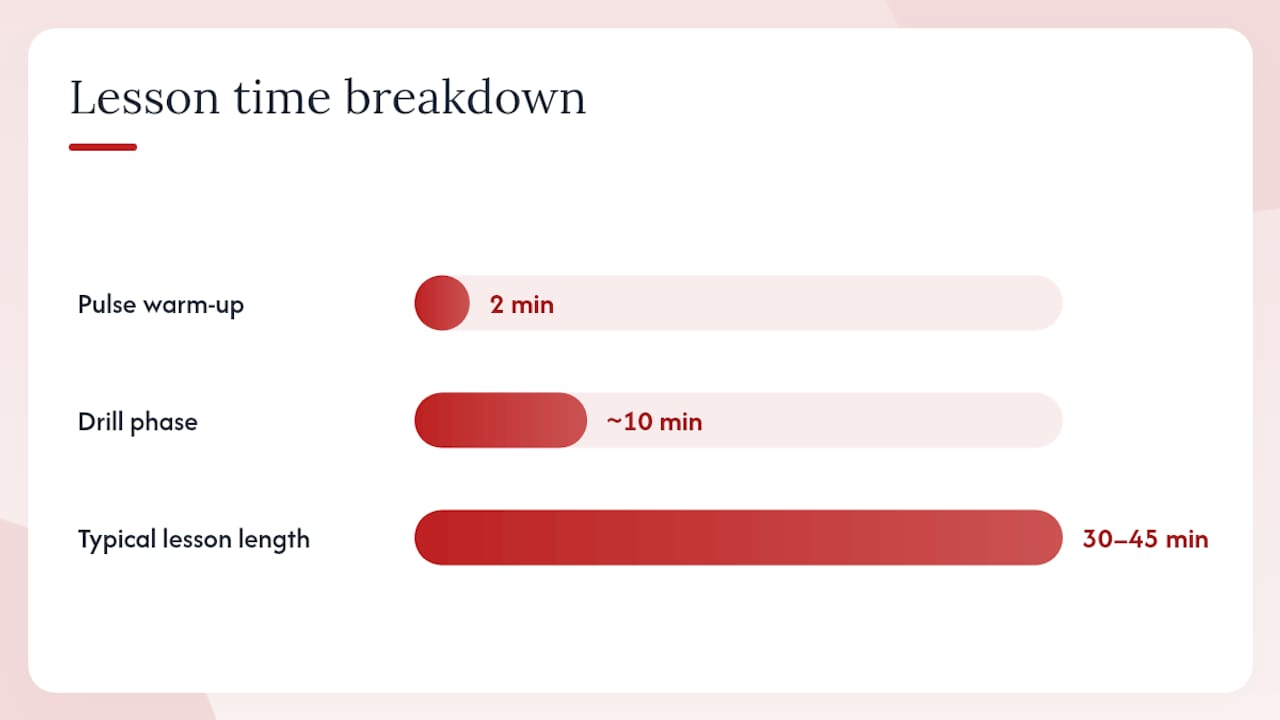
A typical 30–45 minute lesson begins with a two-minute pulse warm-up: the student taps a steady beat while the teacher counts aloud, then transfers that pulse to a scale in quavers. This establishes a physical sense of the beat before any repertoire is opened.
The drill phase (roughly ten minutes) focuses on the specific rhythmic challenge in the student’s current piece. If the piece contains dotted rhythms, the lesson uses a dotted-rhythm drill at a slow tempo, hands-separate, before applying it to the passage. If syncopation is the issue, the teacher isolates the off-beat notes and rebuilds the passage from the on-beat anchor.
The repertoire phase applies the drill directly to the piece. The teacher marks the score at the breakdown point, and the student drills that unit until it is clean. Progress is measured by how many repetitions it takes to stabilise the unit, and that number is recorded in the student’s practice notes for the week.
Lessons at Dan Piano Studio cover classical and jazz piano, ABRSM and Trinity exam preparation, and improvisation, all of which involve specific rhythmic demands. Exam candidates work with the rhythmic patterns and time signatures required at their grade level, using the diagnostic metronome method described in this guide.
Studio: Dan Piano Studio, 23 Purchese Street, London (Camden/King’s Cross area), and online worldwide.
Qualifications:
Student feedback:
Awards and recognition:
A note from the instructor on what rhythm practice really requires
Most students come to me believing their rhythm problems are a talent issue. They are not. Every timing problem I have seen in lessons, from a beginner losing the beat on a rest to an advanced student whose triplets collapse under pressure, has had a specific, fixable cause. The cause is almost always one of two things: practising too fast, or practising the whole passage instead of the failing unit.
The single most useful thing you can do right now is to find the one bar in your current piece where the rhythm breaks down, mark it with a pencil, and spend five minutes on those two or three notes alone. Not the whole piece. Not even the whole bar. Just the notes that fail. That is where the improvement lives.
Rhythm-focused piano lessons at Dan Piano Studio
Consistent rhythm improvement comes from structured, teacher-guided practice, not from drilling alone and hoping the timing settles. At Dan Piano Studio, in-person lessons in Central London (Camden and King’s Cross) and online sessions worldwide are built around exactly the kind of focused rhythm work this guide describes.

A lesson or short coaching pack gives you a teacher who can locate your specific breakdown point in real time, mark your score, and set you a targeted drill for the week. You leave each session with a clear, measurable task rather than a vague instruction to “practise more.” Online lessons work identically: the teacher hears your playing, identifies the failing unit, and guides you through the fix live.
Whether you are preparing for an ABRSM or Trinity exam, working through a jazz piece with syncopated rhythms, or simply trying to play a piece evenly from start to finish, the approach is the same: find the problem, isolate it, fix it slowly, rebuild tempo. Book an in-person or online lesson at Danpianostudio to get started.
Sources
Pro Tip: Start with the Pianist Magazine metronome article and the Feezell PDF. Together they cover the two most common gaps: not knowing how to set the metronome usefully, and not having a graded set of patterns to drill.
Recommended


Comments