


Studio tested 10–15 minute routine to master piano octave technique

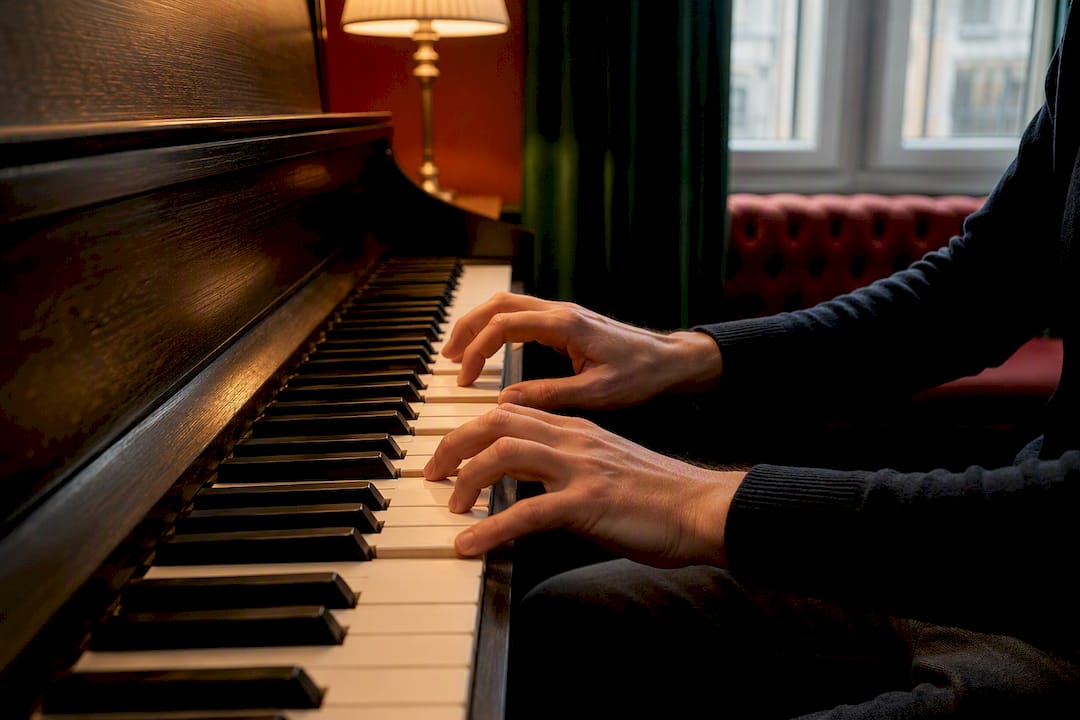
Fast, accurate octaves come from relaxed wrist motion working with a stable hand arch, not from arm force or gripping. Keep your hands close to the keys, let the wrist absorb the up and down motion, and reserve the arm for repositioning across the keyboard. The exercises below build that habit progressively, from single slow octaves to full passagework.
TL;DR:
Relaxed wrist motion and proper hand arch are essential for fast, efficient octaves, reducing fatigue and preventing injury.
Using the wrist as the primary mover, rather than the arm, allows for quicker, smoother octave technique, especially when the wrist remains unlocked.
Practicing with correct fingering, grouping, and gradual speed increases ensures long-term automaticity, avoiding the development of bad habits early on.
Addressing common issues like uneven sound or pain involves fixing hand posture, reducing excess movement, and recording practice to identify misalignments.
Fully connecting octave technique requires patience, focus on comfort, and staged exercises, rather than force or rushing to increase speed prematurely.
Table of Contents
Octave technique checklist before you sit down to practise
Run through this before every octave session, especially if you’ve come straight from repertoire that uses a different hand shape.
Arch the hand: thumb and pinky form the outer frame; middle fingers stay relaxed and slightly raised.
Let the wrist do the work: think of it as a shock absorber, bouncing gently rather than pounding.
Use the arm only to move: shift the whole hand across the keyboard, never to strike.
Stay close to the keys: minimal height between finger and key means less time lost to travel.
Pre‑place your fingers: land the shape before you need the sound, not as you play it.
Check your shoulders: if they’ve crept up towards your ears, you’re gripping somewhere.
Start slow: metronome at 60, single octaves, wrist motion only.
That last point matters more than it sounds. Rushing the tempo before the wrist motion is automatic just teaches your arm to compensate, and arm compensation is exactly what causes fatigue later.
Why the wrist, not the arm, is doing the real work
Wrist-driven octaves are faster and less tiring than arm-driven ones for a simple mechanical reason: the wrist is a smaller, lighter joint, and smaller joints move faster with less effort. Pedagogical sources describe effective octave practice as prioritising relaxation and economy of movement over brute force, with speed arriving as a result of that efficiency rather than a separate skill to chase.
The arch is what makes this possible. Most hands have a naturally weaker pinky and a naturally strong thumb, and an uneven octave is almost always that imbalance showing up as a louder bottom note or a late top note. Building an arch between thumb and pinky, with the middle fingers curled up and out of the way, equalises the pressure both fingers can apply.
A locked wrist is the single biggest speed killer in octave playing. If you press down and hold the joint rigid between notes, you’re fighting your own hand on every repetition. Think of the wrist as skimming rather than hammering, a continuous small wave rather than a series of separate blows, since locking the wrist causes pain and actually reduces speed. The arm only steps in for larger jumps, positioning the hand over black keys or shifting registers, never for the strike itself. A practical guide to classical piano technique covers this same wrist-arm division for other passages, and it’s worth reading alongside octave work because the principle carries across almost everything you play.
Getting the fingering right on white and black keys
The standard fingering for octaves is 1 and 5 on white keys, dropping to 1 and 4 when either finger lands on a black key. That’s not a rule to memorise blindly. It exists because the fifth finger struggles to reach comfortably onto a raised black key without twisting the hand, so the fourth finger takes over whenever the top or bottom note sits on one.
Use 1–5 as your default on white-key octaves.
Switch to 1–4 whenever the top note is a black key, and adjust the base of the hand slightly rather than stretching.
For legato octave passages, detach the thumb a fraction and let the top note carry the melodic line, since emphasising the top voice with the fourth or fifth finger is what actually reads as connected to a listener.
Pre‑place the whole hand shape rather than reaching with the thumb first, which is the most common cause of missed notes at speed.
Practise sixths and simple arpeggio patterns daily to close the strength gap between thumb and pinky. Exercises that build finger independence work well here because they isolate the same imbalance without the extra span of a full octave.
Fingering choices you make slowly become automatic at speed, so it’s worth getting this right in the first week rather than correcting it three months in.
A progressive octave practice routine that actually builds speed
Treat this as a four-stage ladder. Don’t skip a stage because it feels too easy; that’s usually where the actual gains happen.
Single octaves, metronome 60. Play a C major scale in octaves, hands under an inch above the keys, wrist doing all the vertical work and the arm only sliding the hand along. This mirrors the exercise Living Pianos recommends for building the wrist-arm split from scratch.
Two-to-the-beat, then three-to-the-beat. Once single octaves feel loose rather than effortful, double and triple the notes per click without raising the tempo. Speed should feel like a natural extension of the same wrist motion, not a new gear.
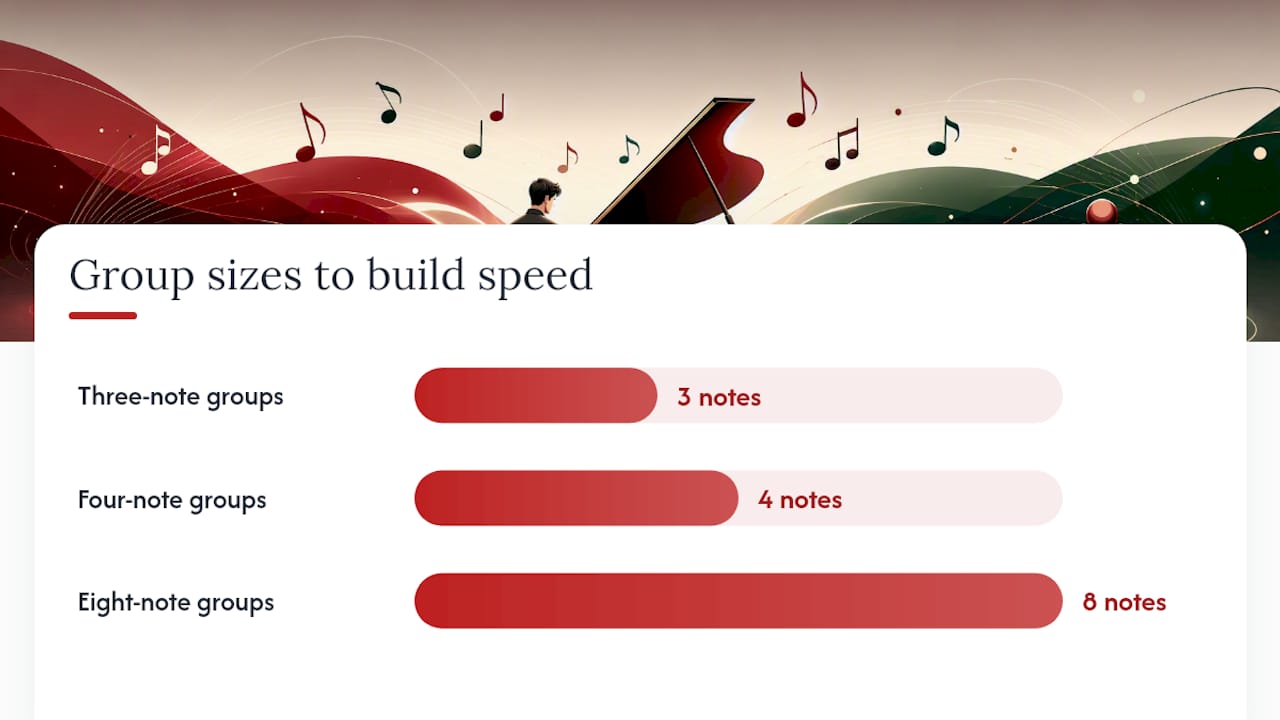
Group building. Start with three-note groups, then four, then eight, adding one note roughly every week rather than jumping straight to a full scale run. Historic octave studies back this staged approach, prescribing staccato-first practice with strict fingerings before legato is introduced, precisely because it lets coordination catch up with intention.
Shadowing and staccato drills. Practise silent key touches (shadowing) to fix the shape without sound, then staccato-only repeats to sharpen the release. Descending double-octave scales are excellent once the ascending pattern feels secure.
Keep the dynamic quiet throughout. Practising at low volume for longer stretches builds endurance better than short loud bursts, since loud practice tends to mask the very tension you’re trying to eliminate. Take short breaks every ten minutes or so, and log which group size and tempo you managed each week, because the trend matters more than any single session.
Pro Tip: Film yourself from the side during the group-building stage. It’s far easier to spot a creeping arm or a stiffening wrist on playback than to feel it in the moment.
For readers layering octave work into exam pieces, a piano exam preparation checklist helps sequence this alongside everything else you need ready by the test date.
Troubleshooting: fixing uneven, slow or painful octaves
Most octave problems trace back to one of three causes, and diagnosing the right one saves weeks of practising the wrong fix.
Uneven sound: usually a weak arch or an imbalanced thumb and pinky. Isolate the top note and practise it alone, then reintroduce the bottom.
Speed stalling: almost always excess motion height or fingers lifting too far from the keys. Reduce the group size back down and rebuild rather than pushing through at the stuck tempo.
Pain or fatigue: stop immediately. Check for a locked wrist or shoulders riding up, then drop back to sixths and rest before returning to full octaves.
Can’t tell what’s wrong: film yourself or use a mirror. Recording practice from the player’s side reveals misalignment that’s almost impossible to feel from the inside.
A guide to piano posture for beginners is worth revisiting here too, since poor bench height or slumped shoulders often shows up first in octave passages before anywhere else.
Making octaves sound musical, not mechanical
Technical accuracy is only half the job. Legato octaves need the thumb detached slightly so the top note, carried by the fourth or fifth finger, does the melodic work while the bottom note simply supports it. Voicing matters more than volume here: colour the sound with arm weight rather than force, and resist the urge to “shout” through a passage just because it’s marked forte.
Pedal deserves restraint. Practise every octave passage without pedal first so your ear can hear exactly what the fingers are doing, then add pedal sparingly to connect phrases rather than to disguise unevenness. This staged approach, practising without pedal before reintroducing it, tends to produce a cleaner sound in the end.
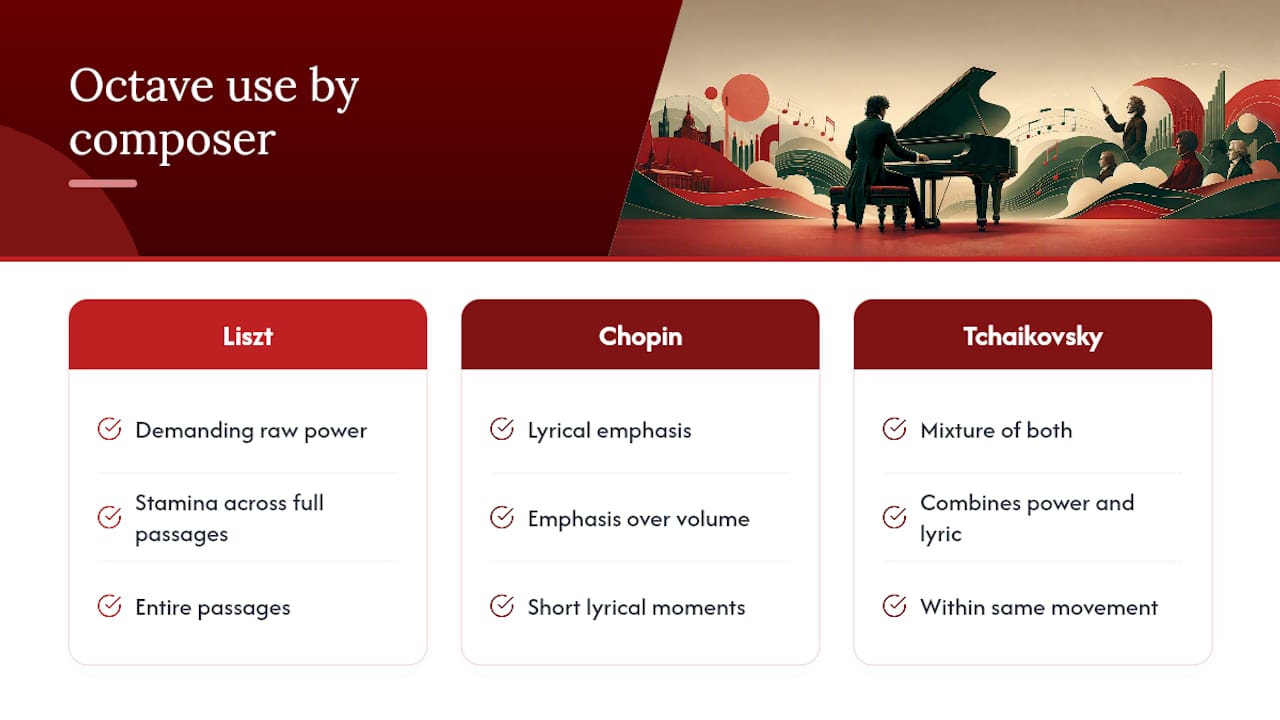
Repertoire treats octaves differently depending on style. Liszt often demands raw power and stamina across full passages; Chopin tends to use octaves for lyrical emphasis rather than volume; Tchaikovsky frequently mixes both within a single movement. Learning core chord progressions helps you anticipate where octaves are likely to appear structurally, which makes the fingering decisions above much faster to apply on sight.
The Dan Piano Studio approach to teaching octaves
A daily ten to fifteen minute octave routine, drawn from the progressive plan above, is what we build into lessons at Danpianostudio. We film students’ hands during practice and track tempo and repetition counts week on week, because progress that isn’t measured is easy to imagine rather than see. Younger students build towards octaves through sixths first, introduced only once the hand comfortably spans the interval, a sequencing also reflected in general guidance on when children should start piano lessons.
Why patience beats force in octave practice
Octaves punish impatience more than almost any other technique, because the shortcut (arm force) feels productive for about a week before it causes pain or a plateau. Hand size matters less than people assume; even a modest span develops workable octaves once the arch and wrist motion are secure. Prioritise comfort over speed in every session, and treat any twinge as a stop signal, not something to practise through.
— Dan
Book octave-focused lessons with Danpianostudio
Reading about wrist motion and arch shape only gets you so far. A single lesson with Danpianostudio gives you a proper diagnosis of what’s actually happening in your hand, tailored exercises matched to your current span and strength, and a practice plan you can take away and follow without guessing whether you’re doing it right.
Lessons run in Central London, Camden, and King’s Cross for pianists who want hands-on correction, and online piano lessons work well for remote students since technical diagnosis and practice planning translate easily to video. If you’re closer to home, home piano lessons bring the same tailored approach to your own instrument. Get in touch to book a session and start working on the specific habits holding your octaves back.
Sources
Recommended


Comments